Tutorial Intro
Introduction of EHEIM digital device configuration and networking
The API feature is available from the software versions S2036 and S1024 on.
Keep in mind that the S2036 and S1024 versions still have some issues that got fixed in version S2037 and S1025.
Multiple device setup
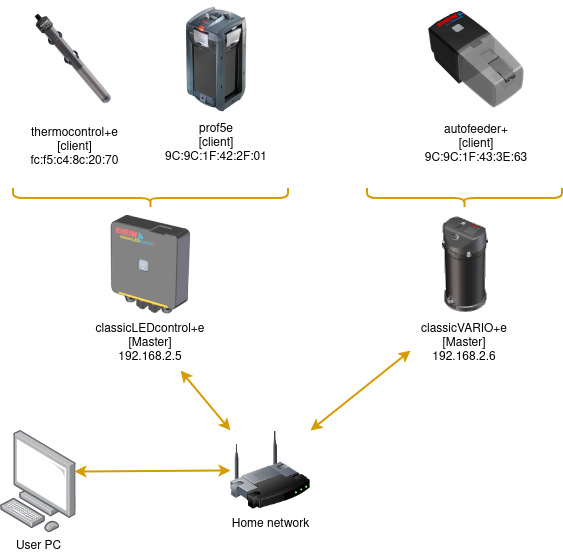
This diagram illustrates a typical network setup with multiple EHEIM devices connected to your home network.
Both the classicLEDcontrol+e and classicVARIO+e function as master devices. You can have multiple master devices on your network, and if you want to group them, you can assign client devices to a specific master.
In this example:
- The classicLEDcontrol+e (IP: 192.168.2.5)
acts as a master and has the thermocontrol+e and professionel5e as its client devices. - The classicVARIO+e (IP: 192.168.2.6)
serves as another master, with the autofeeder as its client.
Communication with client devices always happens through their respective master devices. The master acts as an API server, forwarding messages to its connected clients.
For example, if you want to send a command to the thermocontrol+e, you need to specify its MAC address using the "to" attribute, instructing the master device to relay the message to the target device.
API message flow
If you want to use the API to, for example, read the status of the thermocontrol+e, the message flow follows the structure shown in the diagram.
In this case:
- The API server is the master device with the IP 192.168.2.5.
- You need to request information from the thermocontrol+e, which has the MAC address FC:F5:C4:8C:20:70.
The master device will handle the communication and forward your request to the target client device.
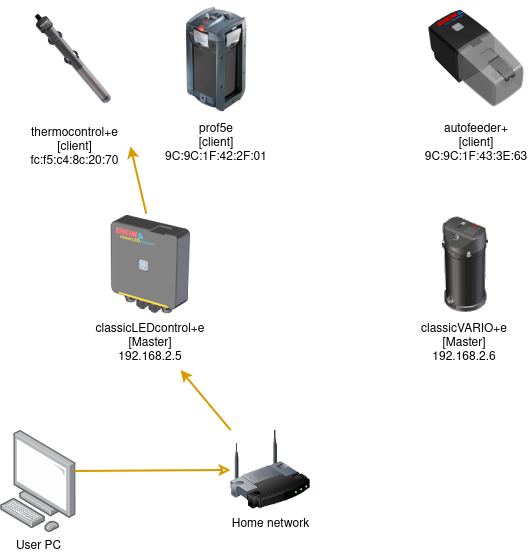
The MAC address of the devices acts as a unique identifier.
You have to send the API request to the master and tell him with the to attribute the target device address. The master will relay the request and send you back the response if is gets one, if not you get a timeout.
An example for the path:
http://192.168.2.5/api/thermocontrol?to=FC:F5:C4:8C:20:70
You can access devices directly if they have their own IP address, meaning you don’t need to use the "to" attribute. However, we strongly recommend always using the master device as the main entry point for communication. This ensures a more reliable and structured network setup.
Basics
To follow the example you can use Postman to test the API. Alternatively, you can use the built-in API test feature, which is embedded in the endpoint documentation on each page. This allows you to send requests and view responses directly within the documentation.
How to get the device MAC address
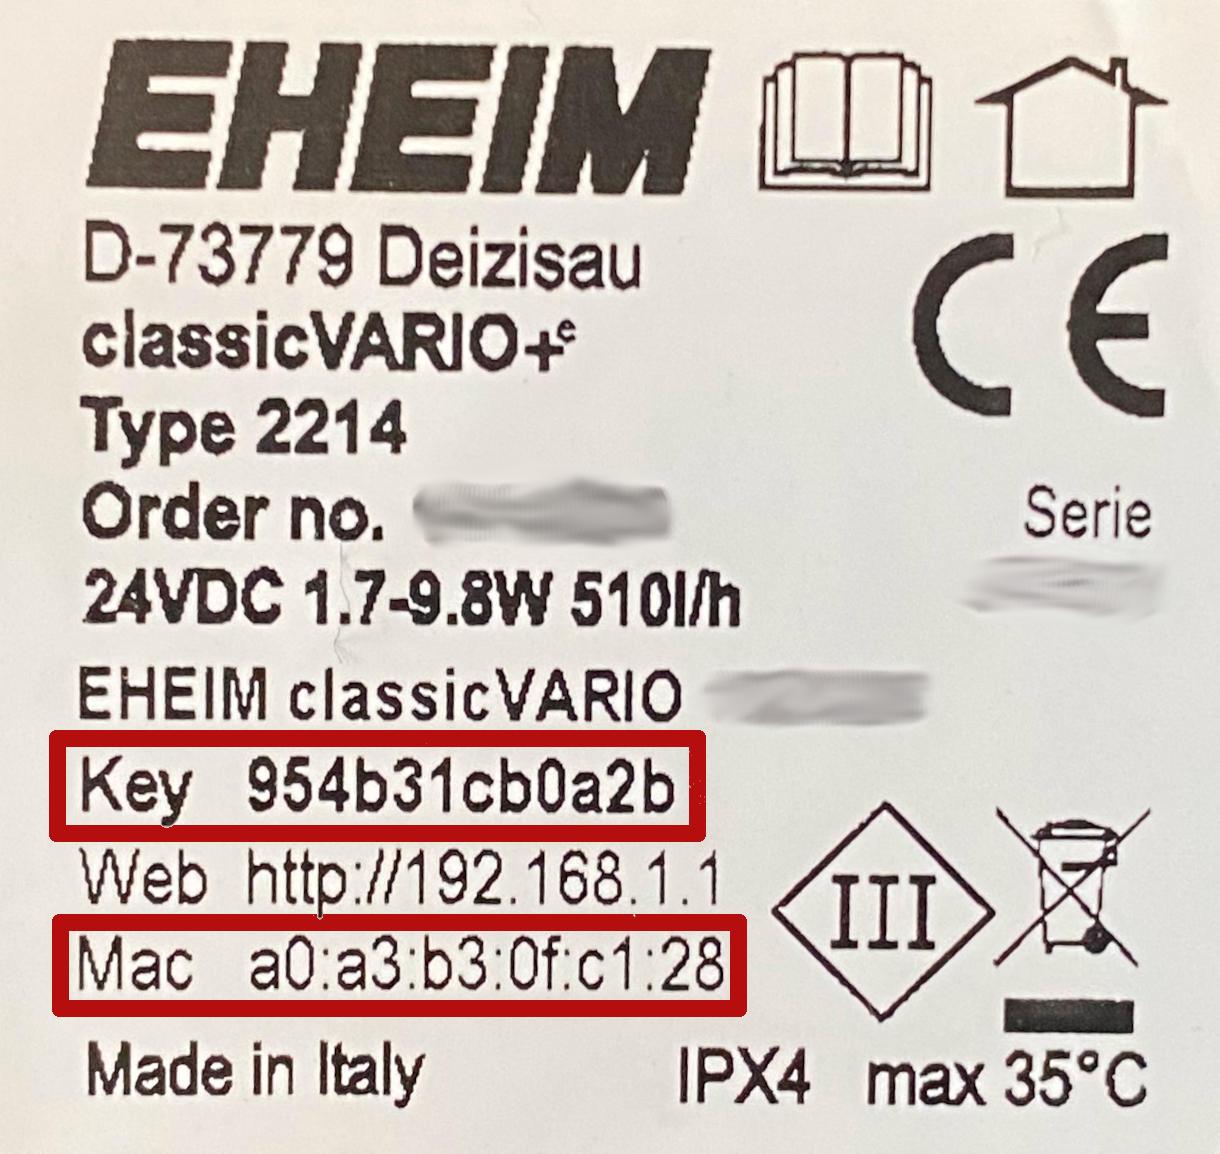
- Device label
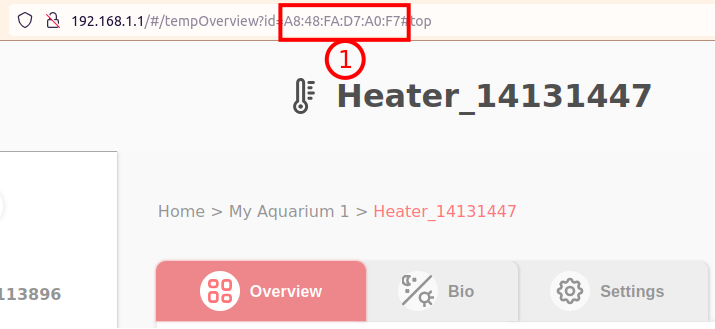
- Get MAC from the webpage
The MAC is always printed on the label onto the device.
If you have a setup with multiple devices already, you can even find the device MAC in the address bar of your browser when you select the device in the UI.
Authentication
To be able to use the API, you have to send the authentication Header with any request.
The Login credentials consist of a username and a password. The default login credentials are:
Username: api
Password: admin
With this information, you can create a BASE64-encoded authentication string.
You can generate this encoded string manually or use the built-in generator available on the documentation page. This encoded string is required for authentication in API requests.
echo -n api:admin | base64 #Linux | result: YXBpOmFkbWlu
If you would like to change the username or password, you can do so by sending a POST request, as described here: Update credentials.
To reset the credentials to their default values, you must manually reset the device. This can be done by holding the touch button or physical button until the light cycles through different colors.
GET - read data
The next step is to make your first API request to retrieve the status of your thermocontrol+ device.
You can find the request details in the documentation under: Get status parameters.
Follow the instructions there to send the request and receive the current status of your device.
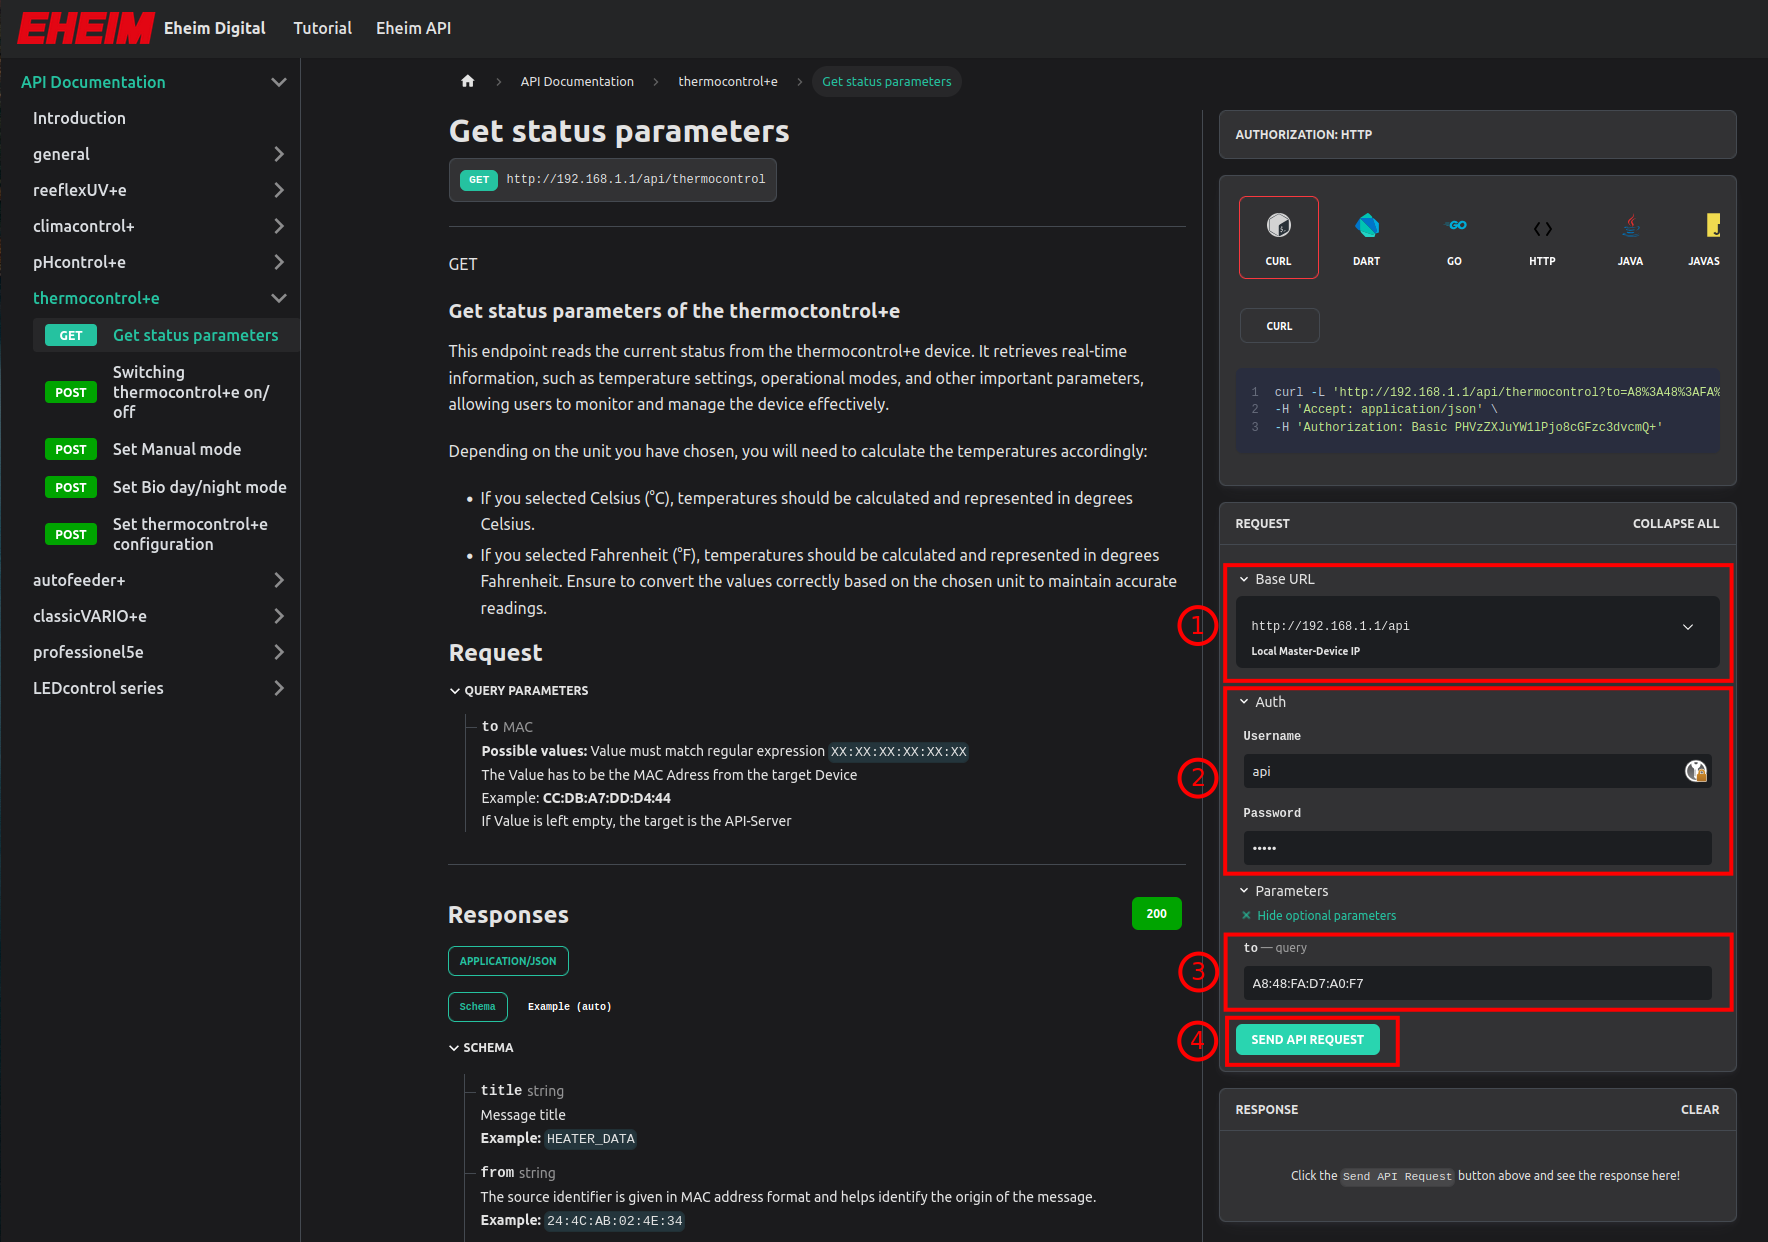
- You can change the IP address to your master IP in this case, we use the local IP 192.168.1.1.
- Enter the authentication credentials (You can see the BASE64 key in the request builder on top).
- Enter the MAC address of the thermocontrol+e you want to reach. This field can be left empty if the target device is already the one with the used IP address.
- Send the Request and wait for the response.
If everything worked, you will get a 200 Response and a JSON like this:
JSON response from thermocontrol+e
{
  "title": "HEATER_DATA",
  "from": "A8:48:FA:D7:A0:F7",
  "mUnit": 0,
  "sollTemp": 190,
  "isTemp": 217,
  "hystLow": 5,
  "hystHigh": 5,
  "offset": 0,
  "active": 1,
  "isHeating": 0,
  "mode": 2,
  "sync": "",
  "partnerName": "",
  "dayStartT": 390,
  "nightStartT": 1080,
  "nReduce": 2,
  "alertState": 0,
  "to": "USER_API"
}
JSON - data format
The API uses JSON as the data exchange format.
GET requests:
- Use an optional "to" parameter in the URL to specify a target device.
- The response is always returned as a JSON object.
POST requests:
- Do not include the "to" parameter in the URL.
- Instead, add the "to" parameter inside the JSON body of the request.
This structure ensures clear and efficient communication with the devices.
{
  "to": "A8:48:FA:D7:A0:F7",    #target device
  "sollTemp": 220,              #configuration settings
  "dayStartT": 360,
  "nightStartT": 1020,
  "nReduce": 1.5
}
POST - write data
Now let's try to set the status LED of the thermocontrol+e to 20% of its brightness.
You can try it out yourself on this page Set status LED brightness.
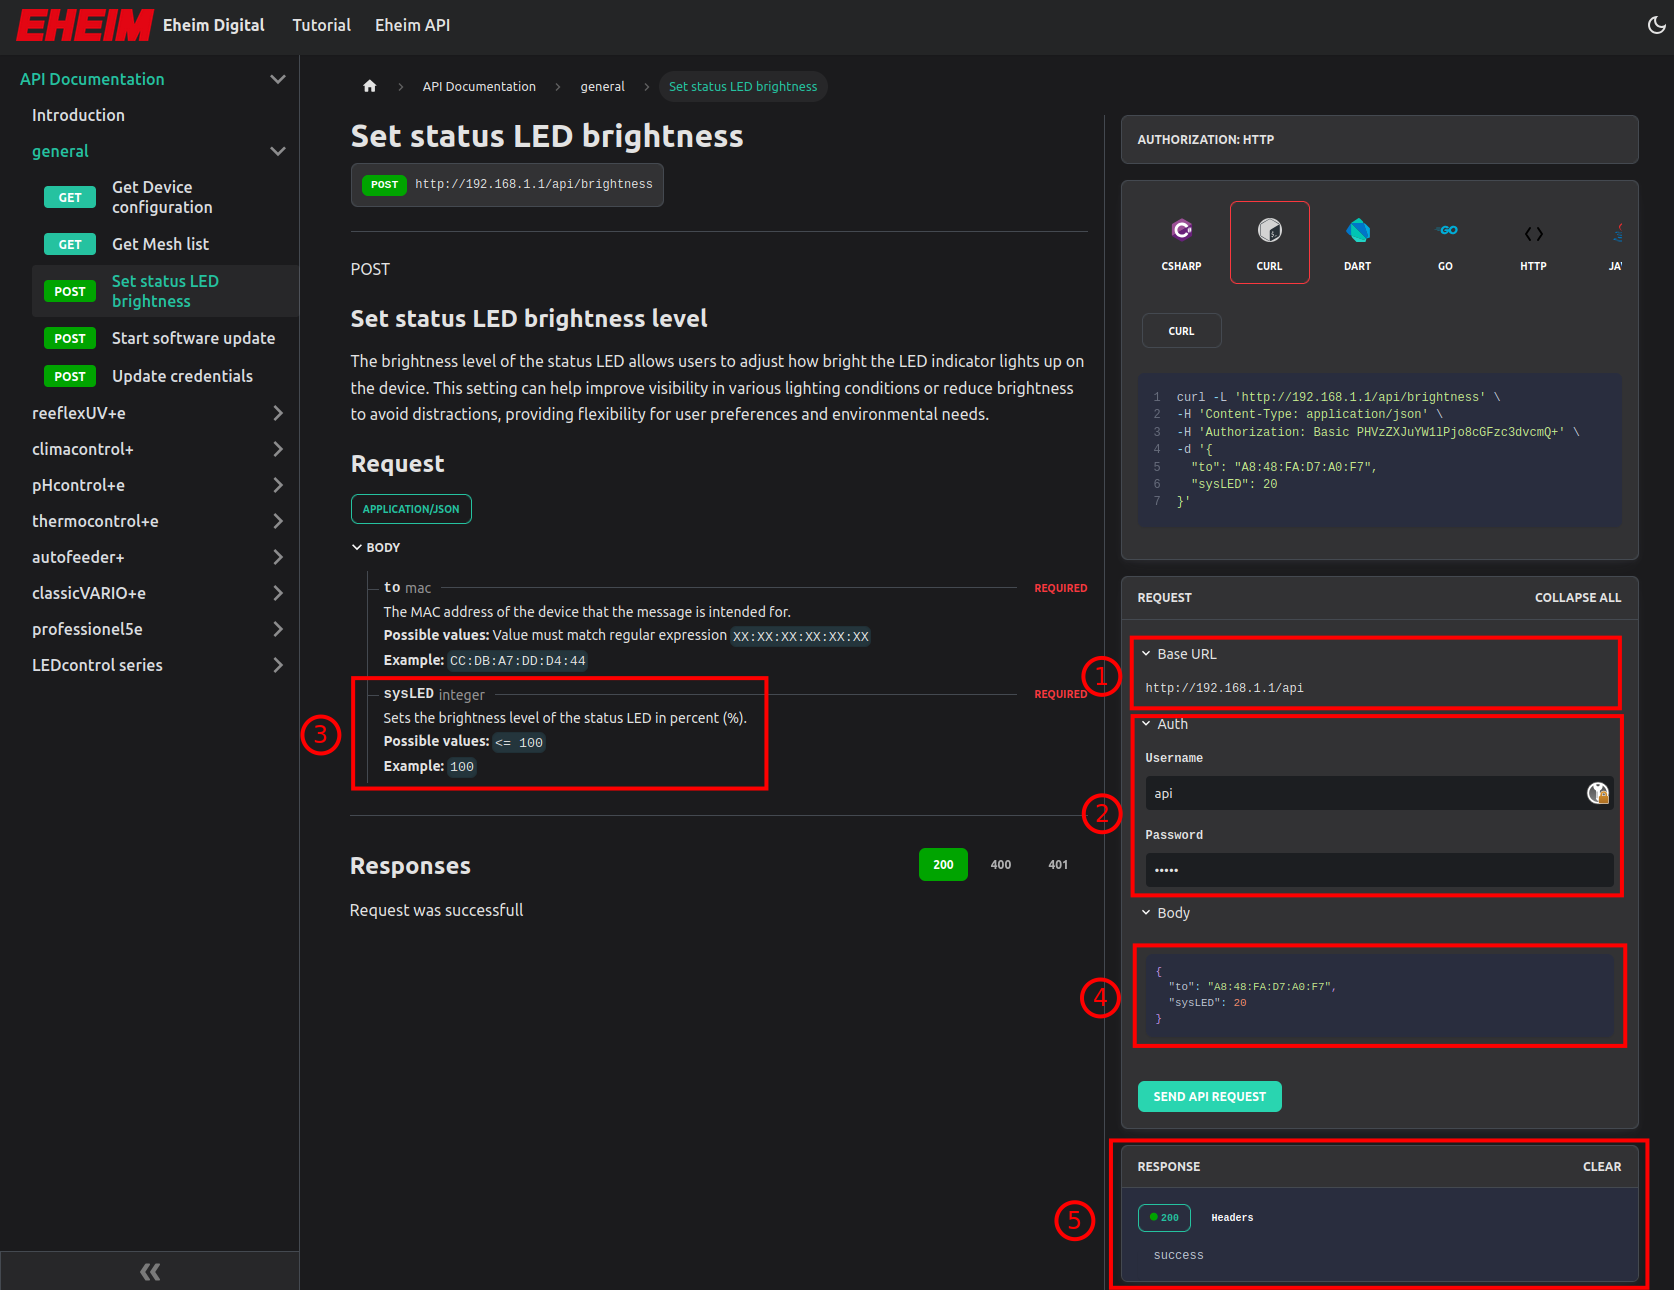
POST operations follow a fire-and-forget approach, meaning you will only receive an error response if authentication fails or if there is an issue parsing the JSON body. If the request is valid, the message is forwarded to the target device, which then checks the parameters against the allowed minimum and maximum values, saving only those that are within range. Regardless of whether all values were accepted, the response will always return a 200 status code with "success". If you need to verify which values were actually stored, you must send a GET request to retrieve the updated configuration.
The steps are similar to the ones above.
- Set the target/master IP address.
- Enter the authentication credentials.
- Now in the body description you can see all parameters you can or have to set.
- Edit the body to your needs.
- After sending the request, you get a response if the authentication and the body parsing were ok.
UI Navigation Tipps
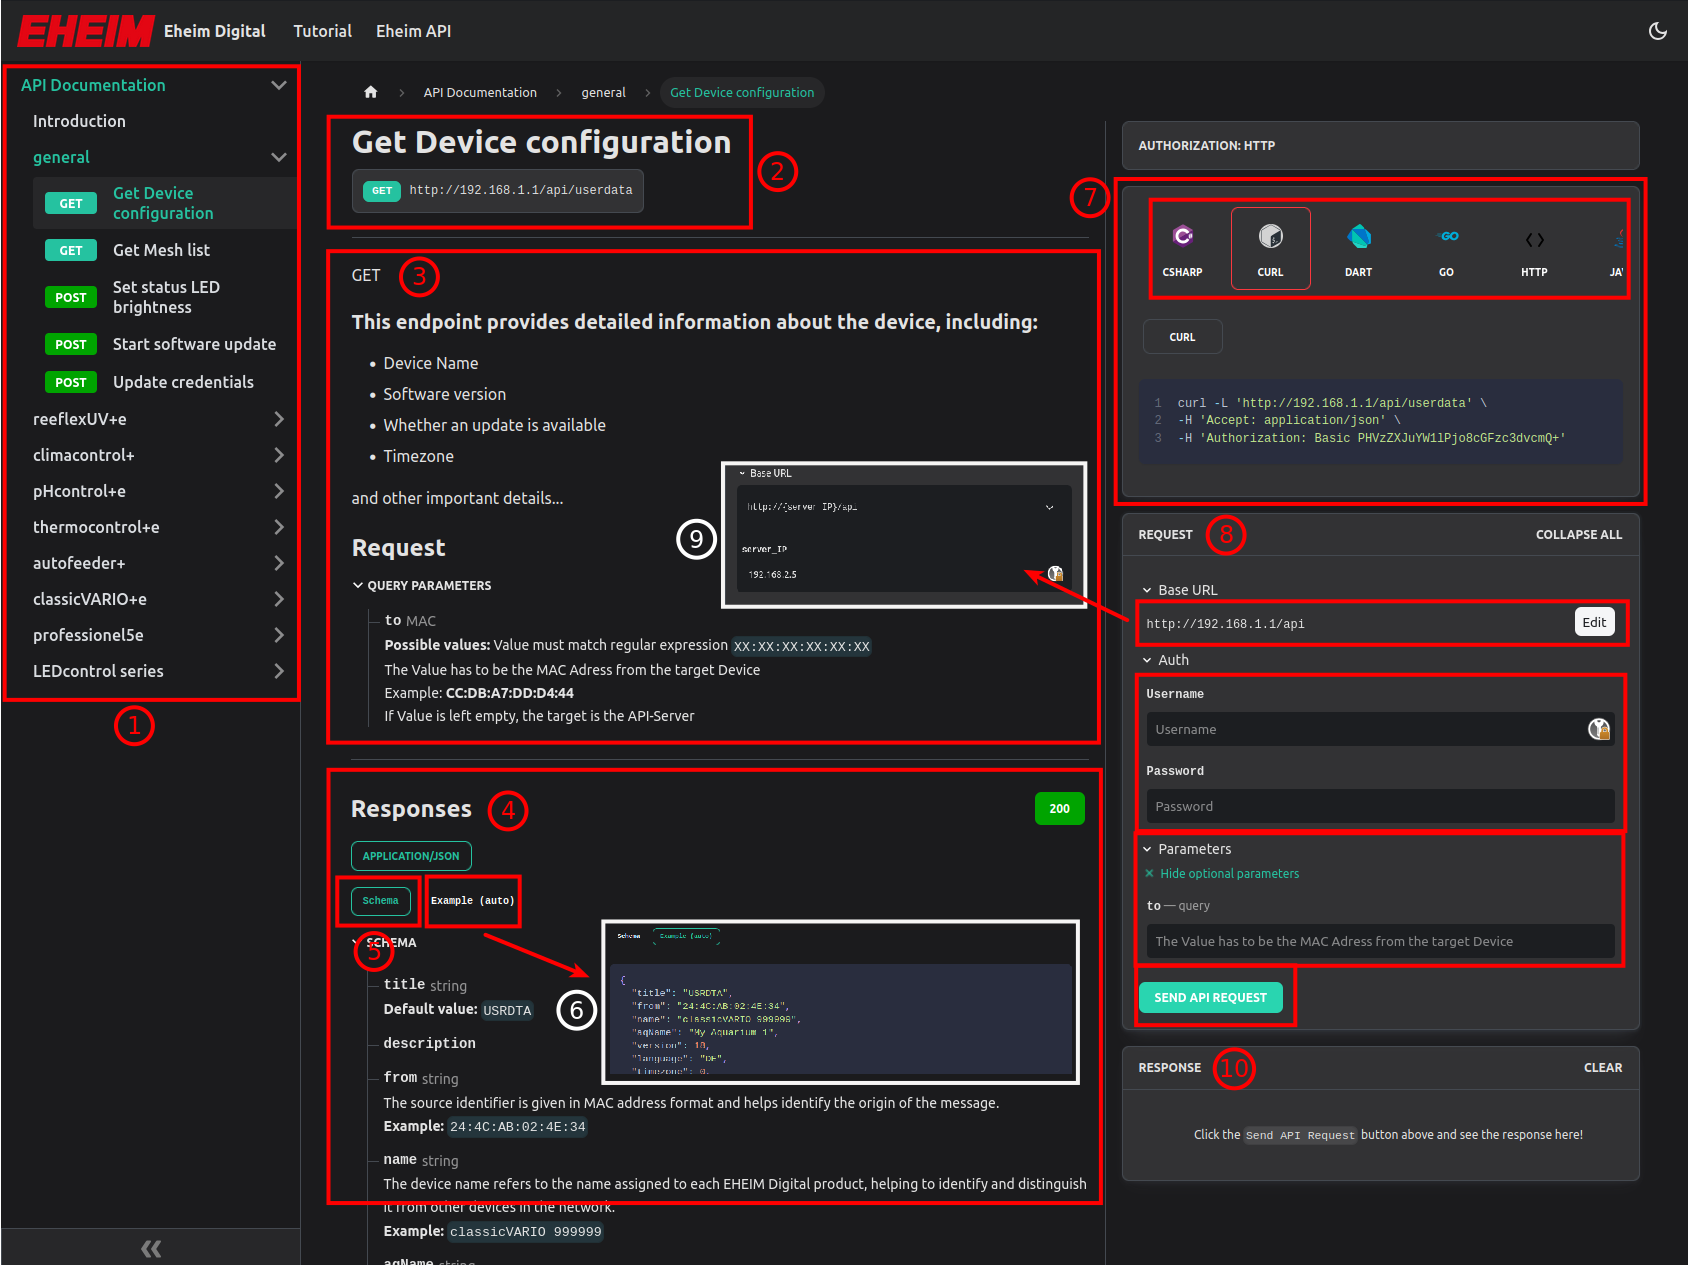
- Device and endpoint list
- Endpoint name and URI example
- Description and query parameters
- Response description
- Schema, value range and parameter description
- JSON example with example values how the response looks like
- Code generator, you can generate code for multiple languages that matches the endpoint
- Request builder, you can test the endpoint with this section. You have to edit the URL to your device IP (9), enter the authentication credentials and if needed to enter a target MAC address
- You can edit the Base URL and change it to the device IP
- The response gets shown here